Username Login
Username Login provides an easy way to allow customers to login to your website or app without remembering an email. Customers can simply login by entering their Username and Password. It is a traditional login option, which is similar to the email login.
The following displays the functional flowchart of Username Login:

The following are the key points that you need to keep in mind while implementing Username Registration and Login provided by LoginRadius.
- Username is treated as an identity in the LoginRadius cloud storage; therefore usernames should always be unique.
- By default, the username is always saved in lowercase characters. For example, if the customer has entered a username as John123 during registration, it will be saved as john123 in the LoginRadius cloud storage, and the customer will be allowed to login only with john123 (lowercase characters).
Note: If you would like to enable case-sensitive username, contact the LoginRadius Support Team.
Username Login Guide
This guide will take you through the process to enable and configure Username Login flow. It covers everything you need to configure and deploy the Username Login feature using the LoginRadius Identity Platform.
Pre-requisites:
- Basic knowledge of HTML/JavaScript.
- Username Registration should be enabled on your account.
Enable Username Registration
Login to your Admin Console account and navigate to Platform Configuration > Identity Workflow > Auth Workflow.
The following screen appears:

The above screen displays that the Username Registration is enabled for your account since the Username Registration box is in green with the enabled text. If not enabled then please follow the instruction given in Step 1 of the Part 1 Configuration and it will be enabled on your site and the box will be in green.
Part 1 - Configuration
This section covers the required configurations that you need to perform in the LoginRadius Admin Console to implement the Username Login functionality.
Step 1: Enable Username field by navigating to Platform Configuration > Authentication Configuration > Standard Login > Data Schema and select the User Name field from the Standard Fields (Basic) section on the right side highlighted in the following screen:

You can also include other desired fields to the registration form. For more details, refer to the following:
Step 2: To allow your customers to login only via the Username feature, in that case you should make the Username field mandatory for your customers during the registration process.
To make it mandatory, navigate to the Advanced tab, select the Mandatory option in settings and click the Save button as highlighted in the following screen:

Case-sensitive Username Case-sensitive Username is an easy way to increase registration and login security. For example, Username, UserName, username, USERNAME will be considered as different users on the same site. Once this feature is enabled, then the Username will be sensitive to the capitalization of letters.
To verify if the Case-sensitive Username option is enabled, navigate to Platform Configuration > Identity Workflow > Authentication Workflow > Advanced Workflow. The following screen appears:

Part 2 - Deployment
The LoginRadius Identity Platform supports a variety of implementation methodologies that allow you to customize the customer flows. This guide focuses on the deployment method for registration and login page using the Deployment > Identity Experience Framework (Hosted).
Make sure you have implemented the following redirects and callbacks from your web application.
Step 1: Locate the Auth Page URL as explained below: Navigate to Deployment > Identity Experience Framework (Hosted), and the following screen appears:

The Auth Page URL displays your unique hosted page domain in the following format:
<https://<sitename>.hub.loginradius.com/auth.aspx>
In the above URL, sitename is the name of your LoginRadius Site.
Step 2: Embed Authentication Pages in your Website, as explained below:
Add a link on your webpage for redirecting customers to the Identity Experience Framework(Hosted) Page.
<a href="https://<LoginRadius Site Name>.hub.loginradius.com/auth.aspx?action=<Desired Action>&return_url=<Return URL>">Register</a>
In the above URL replace the following:
a. LoginRadius Site Name : Your unique LoginRadius sitename as found in step 1.
b. Desired Action: Following are the action list you can use
- Login
- Register
- Forgot password
- Logout
Examples:
Login Page
<a href="https://<LoginRadius Site Name>.hub.loginradius.com/auth.aspx?action=login&return_url=<Return URL>">Login</a>
Registration Page
<a href="https://<LoginRadius Site Name>.hub.loginradius.com/auth.aspx?action=register&return_url=<Return URL>">Register</a>
c. Return URL: The URL you would like to redirect customers after completing the selected action.
Try this link out on your page; you should be redirected over to the LoginRadius Hosted Page where you can register, login, and reset your password.
Note: Use the following URL link to display the profile page of logged in customers.
<a href="https://<LoginRadius site name>.hub.loginradius.com/profile.aspx">View Profile</a>
Use the below JavaScript snippet to capture the access token on your page:
function getParameterByName(name) {
name = name.replace(/[[]/, '\[').replace(/[]]/, '\]');
var regex = new RegExp('[\?&]' + name + '=([^&#]*)');
var results = regex.exec(location.search); return results === null ? '' : decodeURIComponent(results[1].replace(/+/g, ' '));
}
var access_token = getParameterByName(“token”);
Note: We have additional language specific examples here if you want to capture this token in other programming languages.
Step 3: You can use the Access Token as explained below:
Call the LoginRadius API to retrieve the customer profile using the Access Token. Alternatively, you can leverage any of our SDKs to accomplish this.
The following is the script example to retrieve the customer profile:
<script>
 var xhr = new XMLHttpRequest();
 url = "https://api.loginradius.com/identity/v2/auth/account?apiKey=*******-****-****-************&access_token="+access_token
 xhr.open("GET", url);
 xhr.setRequestHeader('X-Requested-With', 'XMLHttpRequest');
 xhr.setRequestHeader('Content-Type', 'application/json');
 xhr.send();
  xhr.onreadystatechange = function() {
     if (xhr.readyState === 4) {
       console.log(xhr.response);
     }
   }
 </script>
On executing the above deployment steps, you will see obtained customer profile data in Console Log of your browser. You can then link the obtained data to your applications.
After complete the above steps and configuration mentioned in part 1, Username Login will reflect on your https://<sitename>.hub.loginradius.com/auth.aspx where Sitename is the name of your LoginRadius Site.
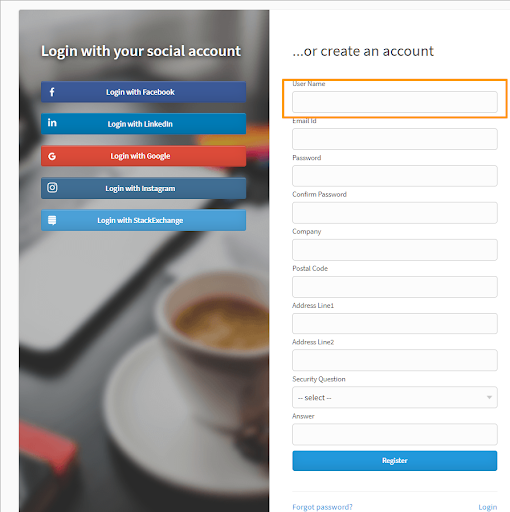
The following displays the Identity Experience Framework Registration page with the Username text field :
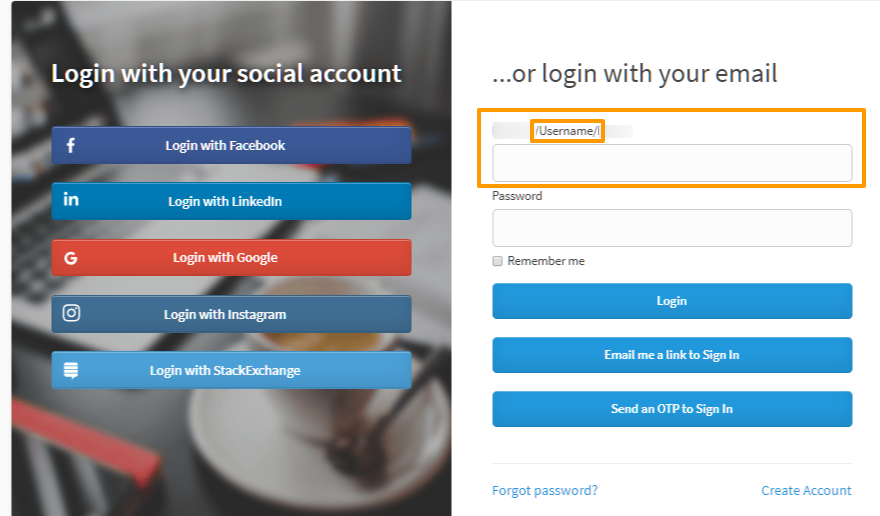
The following displays the Identity Experience Framework Login page with enabled Username Login:
Part 3 - Next Steps
The following is the list of features you might want to add-on to the above implementation: